We have been living out of a cooler that
we kept in our cockpit since we moved aboard on July 1st, 2013. It has
felt like camping. While I do love camping, living out of a cooler was
not fun for very long. We had to buy ice for the first 8 months, and
for the last 2 months we have been fortunate enough to have been lent an
ice maker by our friends Bill and Summer so we didn’t have to buy bags
of ice daily.
For 10 months we were living out of a
cooler with very limited food choices and lots of things going bad from
getting too warm, molding, getting saturated in nasty cooler scum water,
and getting smashed. We never imagined that the project would take so
long, but between having to go to work, not being able to find what we
need on island, and trying to figure out exactly how we wanted to tackle
this major project, more time went by than expected. In retrospect it
would have been a good idea to have bought a small dorm refrigerator
from Home Depot to use until the project was complete, since we spent at
least that much money on ice. Moral of the story, many boat projects
will take ten times longer than you plan!
Why did we want to take on such a
project, you may ask? Well, not only did the old refrigeration system
look nasty, it didn’t work at all. Everything was the original system,
from 1985. The compressor was basically a big block of rust, the
insulation and seals were not energy efficient, and the cold plate
system needed to run off of the engine, which we didn’t want to have to
run multiple times per day to keep our food cold. Plus, minor detail,
our engine does not work. We have decided to re-power and get a new
engine soon. That’s our next major project.
The first step was gutting it all out and removing the old junk.
Old Nasty Refrigeration Box
Old Nasty Freezer Box
Old Broken Cold Plate
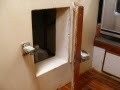
Next, the doors had to be removed.
Freezer lid removed
Front door to refrigeration box
The boxes were very uneven, so taking
exact measurements was a big challenge. There is nothing square or
flush about these boxes at all. Skeeter took as accurate measurements
as he could, and using trial and error managed to cut the foam
insulation to size. He glued the foam into place with construction
adhesive. Then he filled in all remaining gaps and cracks with Great
Stuff expanding foam. Next he measured and cut the FRP panels and glued
them onto the foam. He filled in all of the cracks and corners with
Bondo fiberglass filler. Toxic stuff when you are in an enclosed space
and your head is in the box. Skeeter spent a lot of time upside down
inside of the box. We aired out the boat as much as we could and took
our cat Momo outside to avoid the toxic fumes. After all of that
dried, Skeeter smoothed everything out by sanding, sanding, sanding.
Insulation, FRP panel, and wood ledge added
Next step, he cut holes for the spill
over fan between the freezer and refrigerator boxes. Then he cut a hole
for the refrigeration lines and wiring.
Hole cut for refrigeration lines and wiring
Holes cut for spill over fan
After more sanding, it was time for more
toxic fumes. Skeeter painted both boxes with brushable gel coat. The
fumes were so bad that I smelled them from three boats down the dock!
Inside of box sanded and painted with brushable gel coat
Once that dried, we removed the oven and
the mystery wires that were behind the oven. Those of you who bought
old boats know all about mystery wires. The ones that come from and
lead to nowhere. After that, 29 years of cooking scum and general filth
were cleaned from behind the oven. My favorite cleaner is vinegar,
since it is powerful, non-toxic, and does not harm the marine
environment.
Remove old mystery wiring
29 years of scum clean from area behind oven
Oven removed for access to install compressor
The compressor fit perfectly in the space
behind the oven. Skeeter cut a hole in the bulkhead next to the
compressor to draw cool air from the bilge.
Compressor fits perfectly behind oven
Hole cut next to compressor for air flow from bilge
The evaporator plate was ready to
install. Skeeter and I stretched the copper tubing across the boat,
careful to not kink it. He fed the tubing through the hole in the
freezer box to the compressor, and then mounted the plate into the
freezer box. Next, he installed the spill-over fan.
Ready to install evaporator plate and stretch out coils
Spill-over fan installed
He installed the thermostats in both the
freezer box and the refrigeration box. Finally, he wired everything
together and VIOLA! He closed the doors, flipped the switch, and cold
air was being made. We’ll see tomorrow how cold it gets. We are SOOOO
excited!!!


No comments:
Post a Comment